Step-by-Step Guide to How to Start Prototyping Project


Why Knowing How to Start a Prototyping Project Can Make or Break Your Product
Knowing how to start a prototyping project the right way can save your team months of costly rework and keep your production schedule on track. Before a single part reaches the assembly line, a prototype lets you catch design flaws, validate materials, and prove your concept to stakeholders — all at a fraction of the cost of full production.
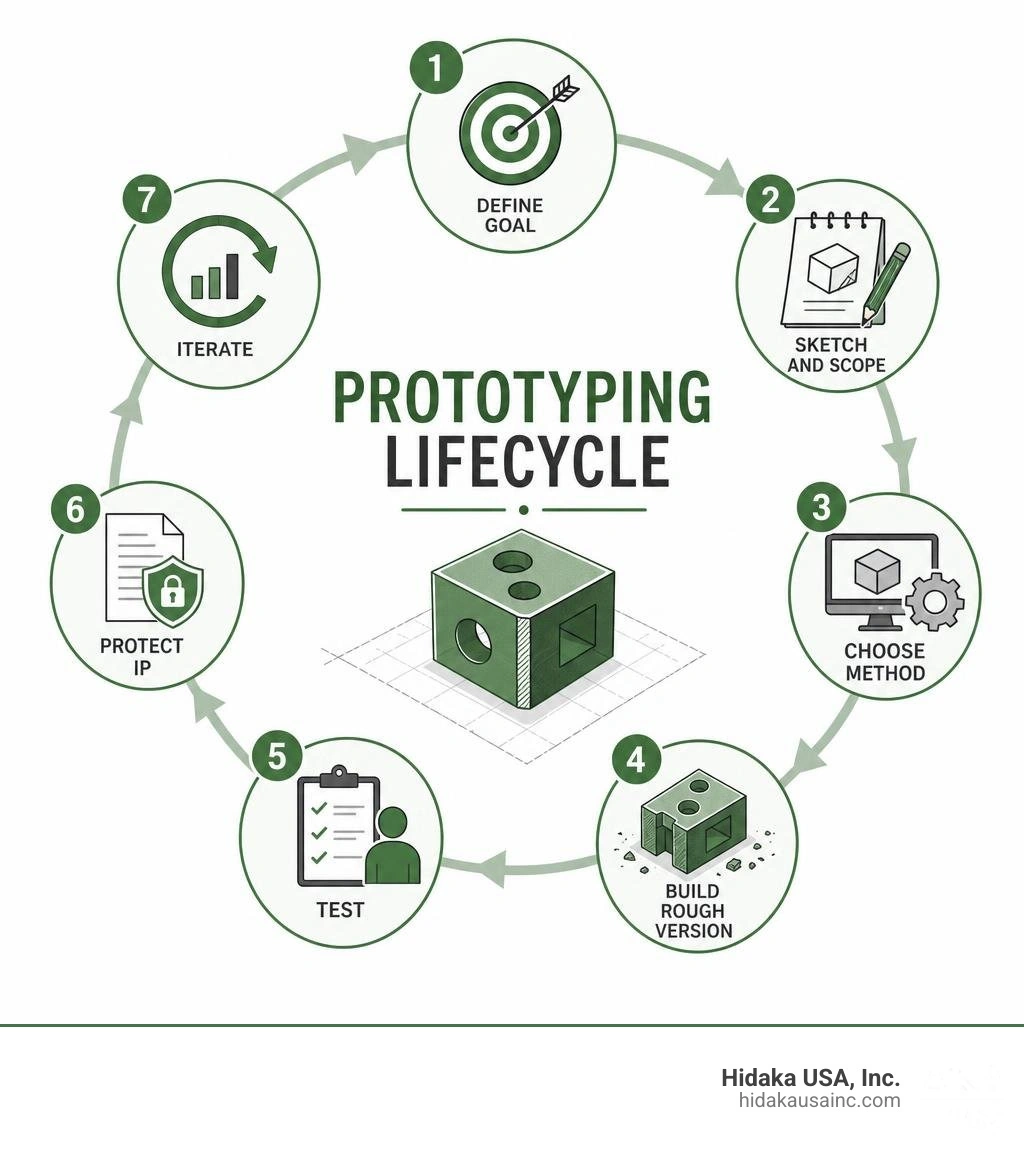
Here is a quick overview of the core steps:
- Define your goal — Decide what one question the prototype must answer (fit, function, or form).
- Sketch and scope — Draw the concept and list only the critical interactions needed for a minimum viable prototype.
- Choose your method — Select physical (3D printing, sheet metal, CNC) or digital (Figma, Proto.io) prototyping based on your goal.
- Build a rough version first — Use fast, low-cost materials before committing to high-fidelity fabrication.
- Test with real users — Gather structured feedback in the actual environment where the product will be used.
- Protect your IP — Have testers sign NDAs and consider filing a provisional patent before sharing designs externally.
- Iterate — Change one variable at a time, retest, and repeat until the design is ready for production.
A prototype is not the final product. It is a targeted model built to answer a specific question before you commit to expensive manufacturing. As one practical rule of thumb puts it: the speed of learning beats the quality of the prototype at every early stage. Getting something testable in front of real users quickly is far more valuable than a polished model that sits on a shelf.
This guide walks through each of those steps in detail — from setting a clear goal and choosing the right tools, to testing, iterating, and protecting your intellectual property.
I'm Yoshihiro Hidaka, founder of Hidaka USA, Inc., a sheet metal fabrication company with over 30 years of experience supplying prototypes and mass production parts to the automotive industry and beyond. That hands-on background in how to start a prototyping project — from first sketch to finished part — shapes every recommendation in this guide.
Glossary for how to start prototyping project:
- how to prototype metal parts
- how to evaluate prototypes
- rapid prototyping advantages and disadvantages
What is a Prototype and Why is it Essential?
At its core, a prototype is the physical or digital voice of your idea. It is a preliminary version of your product built to test specific assumptions before you invest your hard-earned budget into mass production. Too many innovators get stuck in the thinking phase, but until someone else can touch, click, or hold your design, it only exists in your head.
Building a prototype is essential because it shifts your project from abstract concepts to concrete reality. It is a vital risk-reduction tool. By creating a physical or digital mockup, you can easily identify design flaws that software simulations might miss — such as awkward ergonomics, unexpected material flexing, or tight assembly tolerances.
Furthermore, prototypes are invaluable for investor presentations. Today, stakeholders do not buy mere ideas; they buy proof. A working prototype demonstrates technical viability, proves you have mitigated the primary risks of production, and builds massive confidence. To weigh the pros and cons of this phase, you can read our breakdown of rapid prototyping advantages and disadvantages. For inventors looking to make a lasting impression, check out the insights in Why Every Inventor Needs a Prototype (and How to Build One That Works).
How to Start Prototyping Project: Defining Goals and Scope
Before you pick up a utility knife or open your CAD software, you must define what we call a "testable question." A great prototype should write a question in physical or digital form. If you try to build everything at once, you will waste time and money.
To set a clear direction, we recommend using a simple goal format: "As our company is [CONTEXT], we want to get feedback and learning about [SCOPE] from [TARGET AUDIENCE] because [DESIRED OUTCOME]."
For example, if you are developing a new automotive bracket, your goal might be to test whether the bolt holes align perfectly under simulated engine vibration. By focusing strictly on this scope, you avoid getting sidetracked by cosmetic surface finishes. To help plan your boundaries early, refer to the scoping frameworks outlined in Plan and scope your prototype - Unity Learn.
Scoping Your Concept and Setting Success Criteria
When learning how to start prototyping project, scoping means distilling your idea down to its absolute minimum viable prototype (MVP). What are the critical interactions? If you are building a mechanical assembly, the critical interaction might be a single hinge mechanism.
Make a list of features and prioritize them ruthlessly. If a feature does not directly help answer your core testable question, descope it. Document these decisions in a simple design document so your team remains aligned on what success looks like.
Choosing Your Prototyping Method and Tools
The method you choose depends entirely on the risks you need to test. Are you testing how the product looks, how it feels, or how it functions?
In product development, we categorize these approaches into physical prototypes (for structural, mechanical, or tactile validation) and digital prototypes (for software, user interfaces, or conceptual layouts). Choosing the right materials and manufacturing processes is critical. To dive deeper into selecting the right approach, check out How to Create Custom Prototypes: A Practical Guide and learn about different industrial options in our guide to rapid prototyping processes.
Low-Fidelity vs. High-Fidelity Prototyping Options
We break prototyping options down by their level of detail:
- Paper Prototypes and Wireframes (Low-Fidelity): Quick, hand-drawn sketches or basic digital layouts. They focus entirely on structure and flow without any visual polish. They are fantastic for gathering honest feedback because testers won't get distracted by colors or fonts.
- Looks-Like Prototypes (Mid-Fidelity): These models match the final aesthetics, dimensions, and materials but do not actually work. They are perfect for ergonomic testing and investor pitches.
- Works-Like Prototypes (High-Fidelity): These focus strictly on mechanical or electrical function, often using temporary materials.
- Combined High-Fidelity Models: Fully functional and visually complete representations.
For physical builds, you might utilize rapid prototyping additive manufacturing (like 3D printing) for quick form checks. If you require superior structural strength and precise tolerances, you will want to look into rapid prototyping CNC machining or specialized prototype machining.
Selecting the Right Software for Your Digital Prototype
If your project involves a digital interface, selecting the right design software will accelerate your workflow:
- Figma: The gold standard for collaborative, high-fidelity UI/UX design. It allows you to build interactive flows with realistic transitions.
- Canva: An incredibly accessible, drag-and-drop tool filled with templates. It is perfect for non-designers who need to map out a basic layout or presentation prototype quickly.
- Proto.io: Excellent for creating highly animated, mobile-responsive prototypes with complex gestures and pre-built UI components, all without writing code.
Step-by-Step Guide to Building Your First Prototype

Now it's time to get your hands dirty. We suggest following a logical progression to ensure you don't skip crucial design validations:
- Sketch the Concept: Draw your idea as if you are explaining it to a complete stranger. Focus on size, proportions, and basic assembly order.
- Build a Rough Mockup: Grab fast, cheap materials like cardboard, foam board, clay, or hot glue. Get the physical scale right. Hold it in your hands to check the center of gravity and basic comfort.
- Isolate the Core Mechanism: Build a separate, simple version of the most complex moving parts to test their mechanical behavior before combining everything.
- Combine Form and Function: Once the scale and the mechanism work individually, bring them together into your first working prototype. You can find more detail on this progression in the Step-by-Step Guide to Building Your First Product Prototype - Crank Street.
How to Start Prototyping Project with AI Tools in 60 Minutes
If you are building a software prototype or an internal tool, you can skip weeks of traditional coding by using modern AI tools like Claude Code to build a functional model in just one hour. Here is a quick 60-minute workflow inspired by rapid software design:
- Minutes 0–5 (Frame the Problem): Write a 3-sentence problem statement. Define the exact user steps and set strict boundaries on what you will not build.
- Minutes 5–15 (Describe to AI): Prompt the AI with your user journey. Ask it to generate a single-page interactive application using mock data.
- Minutes 15–30 (Iterate on UX): Click through the generated interface. Tell the AI to fix confusing layouts, add progress bars, or refine form validation.
- Minutes 30–45 (Add Edge Cases): Have the AI add loading states and realistic data schemas so the experience feels real.
- Minutes 45–60 (Deploy and Share): Use a quick hosting platform to publish a shareable link for your stakeholders.
For a deeper dive into this ultra-fast development method, read How to Build a Working Prototype in 60 Minutes (Step-by-Step) | falkster.
Setting Up Key Elements: Flows, Connections, and Interactions
When building digital prototypes, pay close attention to user interaction settings. In tools like Figma, you will establish:
- Hotspots: The specific clickable objects (buttons, icons, or links) where user interaction takes place.
- Connections: The visual lines linking a hotspot to its destination frame.
- Flows and Starting Points: The paths users take through your design. Setting multiple starting points allows you to test different user journeys (like a checkout flow vs. an account creation flow) on the same page.
- Interactions and Animations: The transitions (like sliding, fading, or instant changes) that mimic a real, working application.
Testing, Iterating, and Protecting Your Intellectual Property

A prototype is only as good as the feedback it generates. Once your build is complete, you must put it to the test, document the results, and protect your hard work.
How to Start Prototyping Project Testing and Gathering Unbiased Feedback
To get the most out of user testing, you must remain objective. Do not try to defend your design; instead, watch where users struggle.
We recommend utilizing both moderated testing (where you sit with the user and observe their behavior firsthand) and unmoderated testing (where users interact with your prototype independently, providing behavioral data at scale). Let your testers fail if the design is confusing — their friction points are your best clues for improvement. To learn how to systematically analyze these outcomes, read our guide on how to evaluate prototypes. If you are mapping out a customer experience rather than a physical object, you will also find helpful advice in Tips for How to Prototype a Service.
Protecting Your IP with NDAs and Patents
Before you show your prototype to external testers, partners, or manufacturers, protect your intellectual property. Have all external participants sign a non-disclosure agreement (NDA).
For physical inventions, documenting your creation dates and filing a provisional patent application is a smart, cost-effective way to secure "patent pending" status for twelve months. This gives you a safe window to test, refine, and pitch your design before committing to the full patent process.
Costs, Timelines, and Manufacturing Trade-Offs
Prototyping involves balancing speed, quality, and budget. While initial low-fidelity builds are highly cost-effective, moving to professional, high-fidelity physical parts requires careful planning.
For metal components, choosing the right fabrication process early prevents massive headaches later. We specialize in helping teams navigate these decisions. Utilizing services like prototype sheet metal fabrication and precision sheet metal prototyping allows you to test real-world material behaviors under actual operating conditions. When high strength is required, rapid metal prototyping ensures your parts match production-grade specifications from day one.
DIY Prototyping vs. Outsourcing to Professional Firms
While crafting early models in your own workspace is fantastic for quick form checks, there comes a point where you need professional engineering expertise.
- DIY Prototyping: Best for early concept validation, low-fidelity mockups, and fast, low-cost design iterations.
- Outsourcing to Professional Firms: Crucial when your prototype requires advanced machinery, strict quality standards, or complex engineering analysis.
Working with a professional manufacturing partner like Hidaka USA, Inc. gives you access to advanced prototype engineering services. Experienced engineers can perform a Design for Manufacturability (DFM) review. This ensures that the custom prototype you build today can actually be mass-produced efficiently and affordably tomorrow, saving you from having to completely redesign your product later.
Frequently Asked Questions about Prototyping
What is the average cost to build a prototype?
The cost of a prototype varies widely based on its complexity and fidelity. Simple digital layouts or low-fidelity physical models made from basic materials are highly budget-friendly. However, complex physical prototypes involving advanced custom metalwork, electronic components, or specialized tooling require a larger investment.
How long does it take to build a physical prototype?
For early-stage physical prototypes, a typical 3D printing or basic fabrication cycle can take anywhere from a few hours to several days. If you are developing a highly complex invention with custom-engineered metal assemblies, working with a professional development team typically takes one to two months to build a fully functional, production-ready model.
What is the difference between a prototype and an MVP?
A prototype is a preliminary model used to test specific design assumptions, gather feedback, and validate mechanics. It is generally not ready for commercial use. A Minimum Viable Product (MVP), on the other hand, is a functional version of your product containing only the core features, built specifically to be launched to early customers in the market to gather real-world purchasing data.
Conclusion
Starting a prototyping project is one of the most exciting phases of product development. By defining a clear goal, scoping your concept, choosing the right tools, and testing your designs honestly, you pave a smooth path toward manufacturing success.
Since 1989, we at Hidaka USA, Inc. have operated out of our comprehensive manufacturing facility in Dublin, Ohio. Specializing in both custom metal prototyping and high-volume mass production, our team is equipped with advanced 2D/3D laser cutting, hydraulic presses, and AWS-certified welding to bring your physical designs to life under strict ISO 9001 quality standards.
When you are ready to take your design from a rough concept to a high-fidelity, production-ready reality, get started with Hidaka USA Prototyping Services. We are here to help you build a prototype that truly works.